
卓忆翻译:英中对照:Odoo报表设计进阶篇odoo报表
Report Design Workshop
原文:
http://odoo.guide/report-design-workshop/
-
多图翻译加整理测试:英中对照:Odoo报表入门Step by Step,Odoo创建一份报表到打印下拉菜单中
-
卓忆翻译:英中对照:Odoo报表基础
-
卓忆翻译:英中对照:Odoo报表设计进阶篇
-
卓忆翻译:写模块进行Odoo Qweb报表的继承和修改
转载请注明翻译及原文出处,谢谢
In this workshop we will create a brand new report from scratch.
Usually you are starting with a moupck you want to implement. Therefore you have to subdivide it into four views:
在这个讲座里我们会 从头开始 创建一份较完整的 Odoo报表。我们将此报表 细分为4个视图 (视图another_report 由另外3个视图组成):
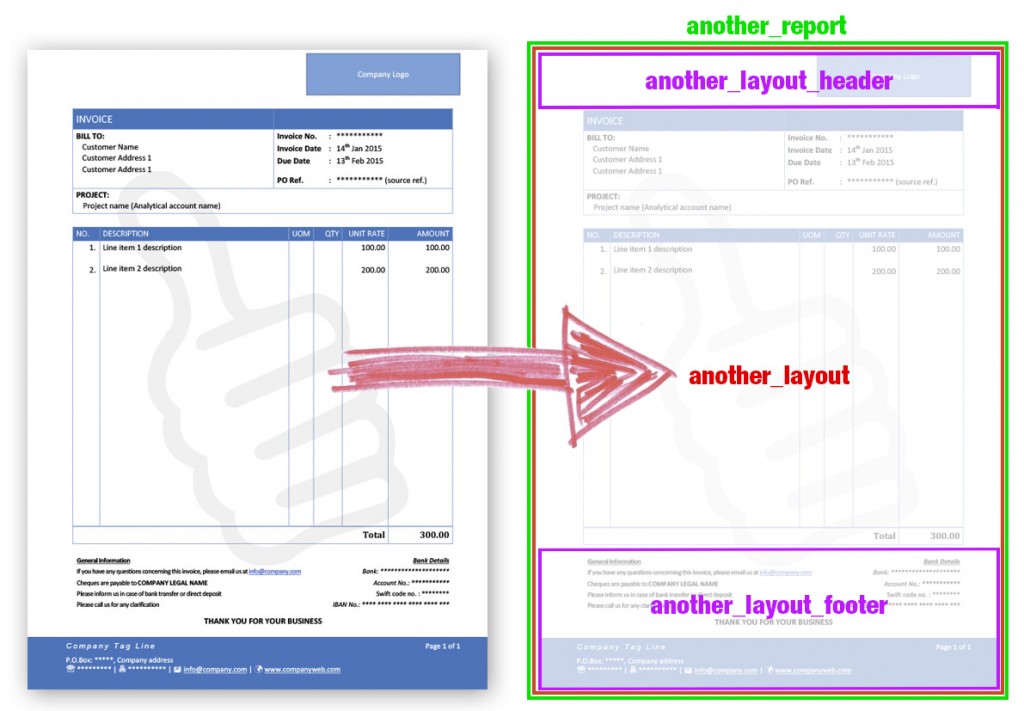
STEP#1 – creating four views 第一步#1 - 创建4个视图
Goto Settings > Technical > User Interface > Views and create:
设置 - 技术 - 用户界面 - 视图 创建
视图1 : another_report , 填写 下面的内容 :
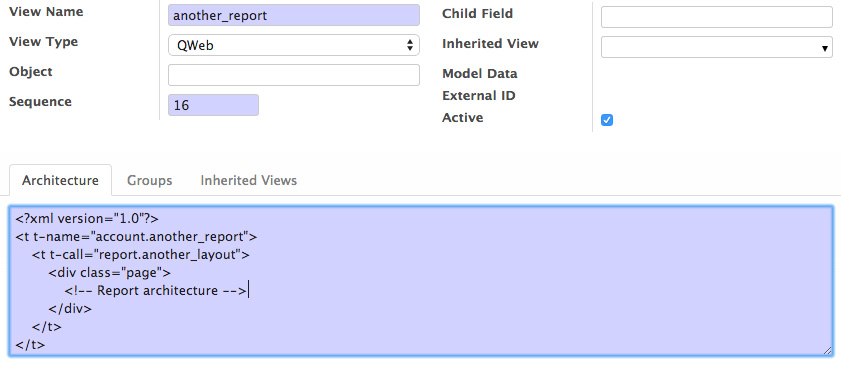
another_report who is generating content and calling another_layout
视图2 another_layout 填写下面的内容:
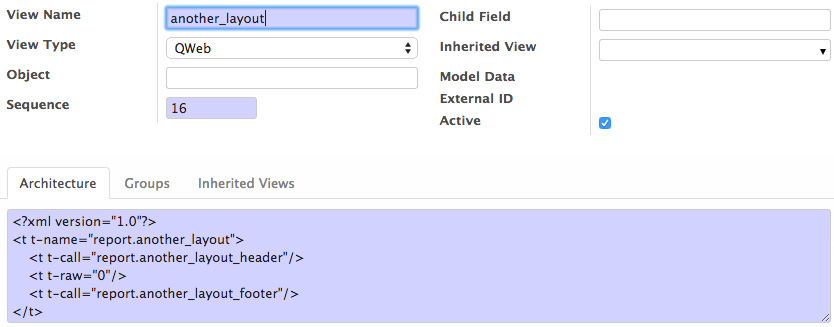
another_layout who is calling the header and footer
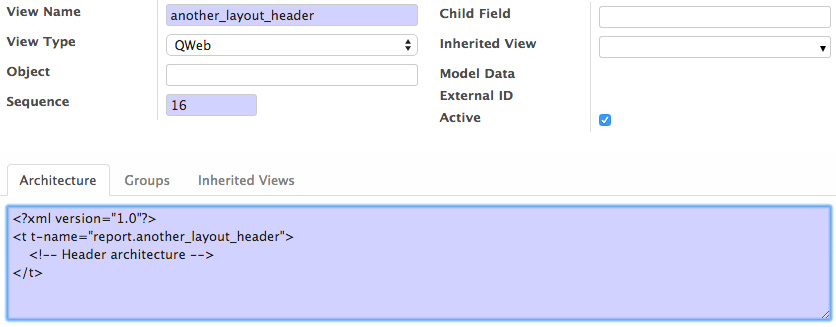
another_layout 的 头部 的 视图 another_layout_header :
another_layout 的 底部 的 视图 another_layout_footer :
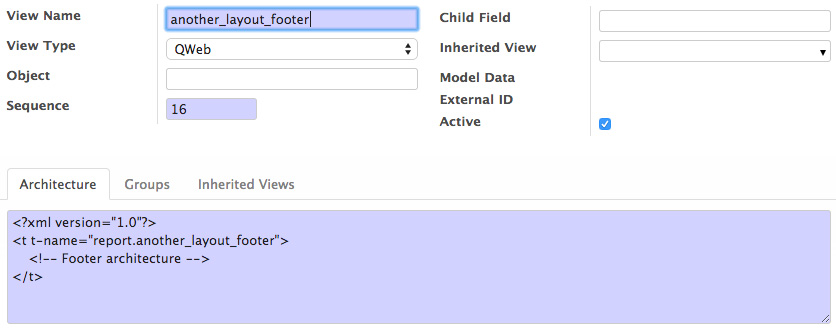
Generally the t-call directive loads sub-templates inside a view architecture. But these sub-templates of course can only be found when they are identifiable by the Odoo system. That’s why we need to create an external identifier for each of them.
t-call 命令 是 加载 子模版 到 一个视图架构。 不过 这些 子模版 需要是 Odoo系统可 辨认的。所以 我们 需要为 这些 子模版 创建 外部id 。
注意:每保存上面的一个视图 都 在 浏览器 中 记录下 相关id (在步骤2中 我们会用到)
STEP#2 – creating four identifiers 步骤#2 - 创建4个 id
Goto Settings > Technical > Sequences & Identifiers > External Identifiers and create:
去 设置 - 技术 - 序号和标识 - 外部id 创建 :


Please note: the Record ID is the id you see in the browser’s address bar when you open a view (s.th. like “…/web#id=603&view_type=…”)
这些 ID 就是 您 打开 对应的 视图 时 在 浏览器 地址栏 中 看到的 id
Odoo报表入门 里面 也有 类似的过程。http://shine-it.net/index.php/topic,17350.0.html
STEP#3 – implementing the report 步骤#3 - 完成报表
Goto Settings > Technical > Reports > Reports and create a report with these mandatory fields filled out:
去设置 - 技术 - 报表 - 报表 里 创建 一个报表 并填写下列内容:
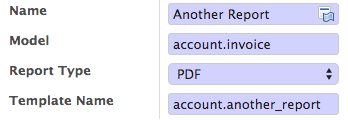
Please note: Odoo recognizes account.another_report as the QWeb view from STEP #1 because we created already an external identifier in STEP #2. So it is automatically associated to this report.
请注意: 在步骤#1中 Odoo 能识别 account.another_report 为QWeb 视图 是 因为 我们 在 步骤#2 中 创建了 外部id.
所以它自动关联到此报表。
记录下 这个报表 在 浏览器 地址栏中的 id ,在 下面 创建 动作绑定 时 您会用到它。
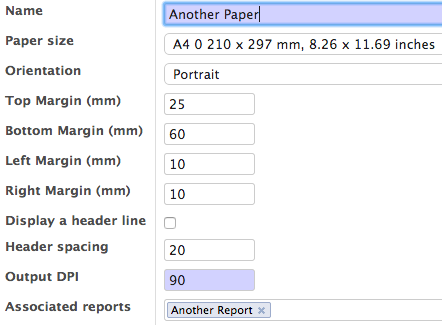
To gain more flexibility create your own paper format under Settings > Technical > Reports > Paper Format and create a format like this and associate it to our new Another Report:
要增加更多的纸张格式 可在设置 - 技术 - 报表 - 纸张格式 中 创建 新的 格式 并 关联它 到 我们的 Another Report:
Go now to Settings > Technical > Actions > Action bindings and create a new action binding to generate another item in the print drop down menu for invoices:
去 设置 - 技术 - 动作 - 动作绑定 创建 一个 新的动作绑定 生成 到 发票 处的 打印 菜单 里:
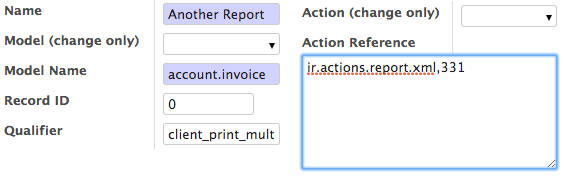
Please note: the Action Reference contains the id of the report you created in this step (you can find the id in the address bar of your browser while the report is shown – should be s.th. like “…/web#id=331&view_type=…”)
请注意: 动作参考 这里 需包含 步骤#3 最开始 您所创建 的报表Another Report 的 id (您可以 找到这个id 在 您打开 对应 报表的 浏览器地址栏中 - 就像 “…/web#id=331&view_type=…”)
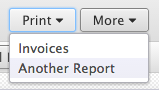
From now on you should be able to choose your new report design in the printing menu for any invoice in Odoo.
This makes it very easy to test our layout during the next steps!
Test it now and Another Report will currently print a blank page. So it’s time to start with the view architectures!
现在您可以在 Odoo的 发票 打印菜单 中 选择 您 新设计的报表 。
在做下一步之前您 很容易测试 它 !
测试发现 此报表 目前 并没有内容 。所以 是时候 开始设计界面了!
STEP#4 – header architecture 步骤#4 - 报表头部的结构
Goto Settings > Technical > User Interface > Views and edit the another_layout_header view you created in STEP#1:
在 设置 - 技术 - 用户界面 - 视图 中 编辑 您在 步骤#1 中 创建的 another_layout_header 填入以下内容:
    <?xml version="1.0"?>
    <t t-name="report.another_layout_header">
        <div class="header">
            <div class="row">
                <div class="col-xs-4 col-xs-offset-8">
                    <img src='/document/static/img/company_logo.png'/>
                </div>
            </div>
        </div>
    </t>
Please note: for storing the image file we used a path known to Odoo. You can choose any path of a module folder – even when the app is not installed.
The header consists of one row only. The image width is a third of the page’s width and positioned on the right edge (col-xs-4 and col-xs-offset-8 explained here).
Our report header – so far…
请注意: 我们使用了Odoo已知的路径来保存 图形。 您可以 选择 模块目录的 任意 路径 - 即使这个模块并未被安装。
头部只包含一行。 图形的 宽度 是1/3 页面 位于 我们报表头部的 右边 -- ..

STEP#5 – footer architecture 步骤#5 -- 报表底部的结构
According to our invoice mockup we should try to create an overall layout structure. That’s why we are conforming the footer with the header by subdividing with same proportions:
按照我们发票我们试着创建所有的布局结构。这是之所以我们需要确认底部与顶部有着相同的比例的原因。

The footer has a right column with a width of a third of the page’s width – same as the header with its logo on the right. We subdivide the wished information into three rows.
底部 右侧有一个 1/3页面宽度 的栏 - 和 顶部 的logo 相呼应 。我们再把 要增加的信息 细分到 3行。
So goto Settings > Technical > User Interface > Views now and edit the another_layout_footer view you created in STEP#1:
去 设置 - 技术 - 用户界面 - 视图 中编辑 步骤#1 创建的 another_layout_footer 为下面的内容:
   <?xml version="1.0"?>
      <t t-name="report.another_layout_footer">
         <div class="footer">

            <!-- FIRST ROW -->
            <div class="row">
                <div class="col-xs-8">
                   <strong>General Information:</strong><br/>
                   Line 1<br/>
                   Line 2<br/>
                   Line 3<br/>
                   Line 4
                </div>
                <div class="col-xs-4" style="text-align:right">
                   <strong>Bank Details:</strong><br/>
                   Line 1<br/>
                   Line 2<br/>
                   Line 3<br/>
                   Line 4
               </div>
            </div>

            <!-- SECOND ROW -->
            <div class="row mt16 mb16" style="text-align:center">                              <strong>THANK YOU FOR YOUR BUSINESS</strong>
            </div>
            <!-- THIRD ROW -->
            <div class="row" style="background-color:#568eff;color:#ffffff;">
               <div class="col-xs-8">
                  <strong>Company Tag Line</strong><br/>
                  Line 1<br/>
                  Line 2<br/>
                  Line 3
               </div>
               <div class="col-xs-4" style="text-align:right">
                  Page <span class="page"/> of <span class="topage"/>
               </div>
            </div>
         </div>
      </t>
Please note: the two span tags with the classes “page” and “topage” will be replaced by the given page numbers via javascript during the rendering.
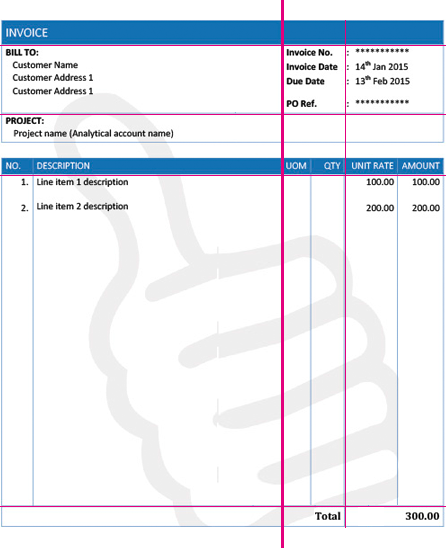
The result should look like this:
请注意: 有2个 范围标签 : “page”和“topage” 通过javascript渲染将会给页面编码 。
结果会是下面这样的:
STEP#6 – report architecture 步骤#6 - 报表结构
Let’s subdivide the main part of the report with same proportions (2/3 and 1/3 horizontally) as we did with the header and footer:
让我们用相同的 比例 划分 报表主要的部分 (水平 2/3 和 1/3 )就像我们报表的 顶部和底部一样。
As you can see – we need at least six rows.
Goto Settings > Technical > User Interface > Views and edit the another_report view you created in STEP#1:
如图您看到的- 我们需要至少6行。
去 设置 - 技术 - 用户界面 - 视图 中编辑 步骤#1 创建的 another_report 为下面的内容:
<?xml version="1.0"?>
<t t-name="account.another_report">
   <t t-call="report.another_layout">
   <t t-foreach="docs" t-as="o"> <!-- this makes the context model data accessible throughout the variable "o" -->
      <div class="page">

         <!-- FIRST ROW -->
         <div class="row">
            <div class="col-xs-12" style="background-color:#568eff;border: 1px solid #568eff;color:#ffffff;">
               <h3>INVOICE</h3>
            </div>
         </div>

         <!-- SECOND ROW -->
         <div class="row">
            <div class="col-xs-8" style="border-left:1px solid #568eff;">
               <strong>BILL TO:</strong><br/>
               Line 1<br/>
               Line 2<br/>
               Line 3
            </div>
            <div class="col-xs-2" style="text-align:right;border-left:1px solid #568eff;">
               <strong>Invoice No.:</strong><br/>
               <strong>Invoice Date:</strong><br/>
               <strong>Due Date:</strong><br/>
               <strong>PO No.:</strong>
            </div>
            <div class="col-xs-2" style="border-right:1px solid #568eff;">
               <span t-field="o.number"/><br/><!-- example of how to access field values -->
               Line 2<br/>
               Line 3<br/>
               Line 4
           </div>
        </div>

        <!-- THIRD ROW -->
        <div class="row">
           <div class="col-xs-12" style="border:1px solid #568eff;">
              <strong>PROJECT:</strong><br/>
              Line 1
           </div>
        </div>

        <!-- FOURTH ROW -->
        <div class="row mt32" style="background-color:#568eff;border: 1px solid #568eff;color:#ffffff;">
           <div class="col-xs-1">NO.</div>
           <div class="col-xs-7">DESCRIPTION</div>
           <div class="col-xs-1">UOM</div>
           <div class="col-xs-1">QTY</div>
           <div class="col-xs-1">UNIT RATE</div>
           <div class="col-xs-1">AMOUNT</div>
        </div>

        <!-- FIFTH ROW -->
        <div class="row">
           <div class="col-xs-1" style="border-left:1px solid #568eff;">1.</div>
           <div class="col-xs-7" style="border-left:1px solid #568eff;">Line 1 Item Description</div>
           <div class="col-xs-1" style="border-left:1px solid #568eff;">100.00</div>
           <div class="col-xs-1" style="border-left:1px solid #568eff;">1</div>
           <div class="col-xs-1" style="border-left:1px solid #568eff;">100.00</div>
           <div class="col-xs-1" style="border-left:1px solid #568eff;border-right:1px solid #568eff;">100.00</div>
        </div>

        <!-- SIXTH ROW -->
        <div class="row">
           <div class="col-xs-10" style="text-align:right;border: 1px solid #568eff;">
              <strong>Total:</strong>
           </div>
           <div class="col-xs-2" style="text-align:right;border: 1px solid #568eff;border-left:0px;">
              <strong>100.00</strong>
           </div>
        </div>
     </div>
  </t>
  </t>
</t>
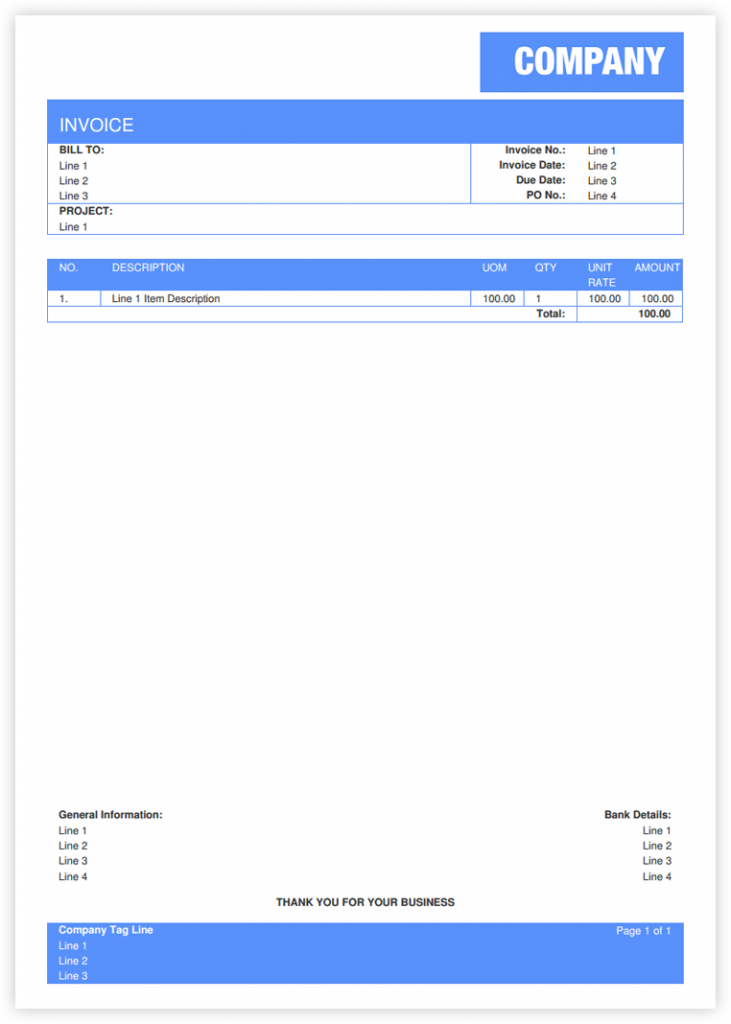
The complete report should now look like this:
最后完成的报表会是下面这样的:
Please note: depending of your wkhtmltopdf version you now may have to adjust a little bit the used CSS styles.
请注意: 基于不同的wkhtmltopdf 版本,您可能需要微微调整使用的CSS样式。
转载请注明翻译及原文出处,谢谢
翻译难免有所疏漏,望见谅,另外这个报表进阶的内容,目前并未测试。
官方QWeb文档:https://www.odoo.com/documentation/8.0/reference/qweb.html

支付宝扫一扫赞助
微信钱包扫描赞助
赏